


-
Machinery
Choose from 20,248 used machinery listings
This article first appeared in Practical Engineering 1940 Vol1 No24. The published information is accurate as of 1940. This article describes tools and techniques employed in Light Engineering at the time.
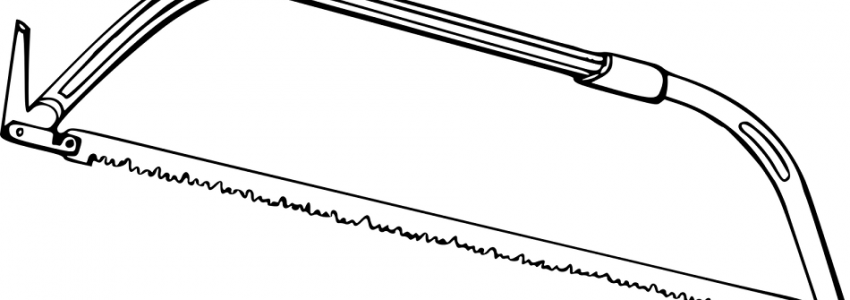
The hacksaw is the only type of saw generally associated with metal-working, but there is another type which is widely used for more delicate work, and especially when producing an ornamental finish in sheet metal. This is the piercing saw. Both types will be dealt with, but the hacksaw claims first attention.
If a saw of this type is to be bought there is a wide choice of patterns, and prices vary from about Is. 6d. to 7s. 6d. As with all other tools, the higher-priced article is the better value if it is intended for hard and continuous use. Of the principal patterns, the tubular one is generally considered the best, provided that it is of good make.
In nearly every case the frame is made adjustable in length, to receive blades from 8in. to 12in. long, and different methods of adjustment are possible. Besides the main length adjustment, provided by moving the two parts of the frame or by sliding the handle along the backbone of the frame, there is a wing-nut or similar adjustment for altering the tension on the blade.
A certain amount of experience is necessary to judge the most suitable tension, but in general the blade should be so taut that there is little tendency toward bending, and yet not so tight that slight twisting while sawing causes it to snap. This matter is regulated to a certain extent by the type of blade in use; this point will receive more attention later.
In addition to the usual pattern of hacksaw, there are others which are intended for special purposes. One of these is being suitable for working on jobs where the space is very limited. It is generally obtainable in two sizes—for blades of 6in. and 8in. Then there is a saw with a very deep frame designed for sawing deeply or even for making internal saw cuts in a sheet.
Hacksaws, of which three types will be discussed, are also made especially for sawing sheets. The blade is more rigid than that of the frame saw, whilst the angle of the blade is such that straight clean cuts can be made across sheets of metal, asbestos or almost any other material.
Coming between the ordinary hand hack saw and the power-driven type, there is one of the bench type consisting of a heavy frame, a bed and a vice clamp. The saw is fitted in two upright guides and is therefore amply supported. This type is useful when it becomes necessary to make accurate cuts in large-section metal, being particularly useful for the less skilled worker. Yet another tool in the hacksaw class is a pad handle. It is useful for short-stroke sawing where the ordinary saw cannot be used; it is suitable for use with broken ends of blades.
Blades are generally made in three lengths : 8in., l0in. and 12in., and are of two principal types. One is hardened throughout the width, the other having hardened teeth and a soft back. Alternatively, the latter may be a double-sided blade with a soft centre; this is widely used for sawing brass tubing, among other things. The all-hard blade has a longer life, of course, but is more brittle and therefore less suitable for the semi-skilled worker; the soft back blade is better when sawing in an awkward place, where there is difficulty in keeping the saw in a perfectly straight line.
The teeth of all blades are given a certain amount of "set"—that is, the teeth are bent slightly outward in opposite directions—so that the kerf, or cut, made is wider than the thickness of the back of the blade. This prevents the blade from jamming in its kerf. Blades. intended for use with mild steel. have 18 teeth to the inch; those for hard steel and brass have 22 teeth to the inch; and those for tubing, sheet, and less robust material have 32 teeth to the inch. These are general figures, and there may be slight deviations from them in some cases.
The usual width of hacksaw blades is 1in., and the thickness .025in.; here again, however, there are variations according to rnake. Additionally, there is an extra-thick pattern which is intended for slotting screw heads and similar work. One make is obtainable as 8in. blades, 14 teeth per inch, and in four thicknesses from .049 to .109in.
In using a hacksaw it is first necessary to decide on the most suitable type of blade, according to, the details given above, and then to fit it to the frame and carefully adjust the tension. The blade should be fitted so that the teeth point toward the front of the frame; that is, so that the cut is made on the forward stroke.
Where possible, set up the metal in the vice so that it is held rigidly and prevented from vibrating. Hold the handle with the right hand, so that the forefinger points down the blade. Hold the front of the frame with the left hand and take up a position similar to that for filing, but preferably with the work at a rather lower level. It is generally agreed that the best rate of sawing is about 30 strokes a minute, but there cannot be any hard and fast rule about this.
It is of most importance to keep the saw in a straight line on both forward and backward strokes, for not only does this simplify the work, but it reduces the chances of the blade being broken. Apply weight with the left hand during the forward stroke, removing pressure when drawing the saw back. When the cut has been taken almost through the metal the downward pressure should be reduced until it is only that provided by the weight of the saw.
When sawing soft metal or tubing it might even be desirable to lift the saw slightly so that the cut is made clean on both sides. The beginner often finds it better to make a small V-cut across the metal with the edge of a half-round file before sawing. This acts as a guide in the same way that a centre-punch mark is used as a guide when drilling.
When an internal cut has to be made parallel to the edge of the metal the blade should be turned through a right angle, for otherwise the frame would be in the way. This is generally done by removing the squared screw at the end remote from the handle and replacing it after turning, and by hooking the other end of the blade to another pin on the handle shank. In other cases the handle also can be turned after removal.
The piercing saw is comparable to the fret saw used for woodwork, but is much smaller and it will be seen that the bowed part of the frame can be moved along a square hole through the end piece which carries the handle. There is a wing-nut for adjusting blade tension. Instead of the blade having holes for fitting to the frame, the latter has two pairs of jaws; this is because of the blade being very narrow for following curves.
A point of special importance is that the teeth of the piercing saw should be pointing toward the handle. In sawing, the sheet of metal is generally held over the vice jaws or over the edge of the bench and is laid horizontally. The saw is held vertically and the cut is made on the downward stroke.
It will be clear that, before sawing can be started, the shape to be cut must be clearly marked on the sheet metal, and that at least one hole must be drilled in the waste portion, so that the blade may be passed through it. In most cases it is helpful to drill a hole in the waste metal at each corner or angle of the design so that the saw can be turned.
The use of a piercing saw is better than the arrangement of drilling a series of holes inside the waste metal and cutting between them with a chisel. When using the latter method the design has to be filed to finish, whereas if the shape has been carefully cut with a piercing saw it is necessary only to clean up the edge by lightly draw-filing. The drilling and chiselling method is, of course, essential when the metal is more than about 1/8in. thick, or if the hole to be cut is farther from the edge than the depth of the saw frame.
Hand shears or snips are most suitable for cutting tinplate and sheet metal of fairly fine gauge, but should not normally be used for sheet iron thicker than abom 20 gauge. Primarily they are intended for tinplate work, and are often called tinman's shears or snips. There are two principal types : straight and curved or bent. There are, however, universal types and others of heavy construction and with compound levers so that they can be used with stouter materials.
The two most widely-used types are both normally obtainable in sizes from 6in. to 14in., this dimension representing the overall length. For most purposes, a pair of l0in. straight and a pair of 8in. curved will be found suitable. When only a small amount of sheet-metal work is to be done it may be more convenient to have a single pair of universal shears.
The blades of these are less robust than are those of the other types, and they are curved outward to permit of easy "pivoting" round a curve. Usual sizes of these universal shears are 8in. and l0in. A pair of shears with a compound lever system, as would be expected, enables thicker and harder sheets to be cut with comparative ease. This tool is also suitable for cutting wire of heavy gauge. Another small point about these shears is that there is a return spring between the handles; the other types are like scissors or pliers.
The method of holding shears of any type is such that one handle is held between the thumb and the palm of the hand, while all but one of the fingers are used to pull on the other. Some workers prefer to use the little finger for opening the shears after each cut, while others use both the third and little finger. In cutting along a straight line, the main thing is to take long cuts and to hold the sheet and the shears straight in front of the body.
Curved or bent shears are often used incorrectly. For all except small curves it is best to hold the shears so that they point away from the line. By this means it is possible to "pivot" them more easily, and to press away the waste metal on the right. While cutting along a curved line, the shears should be slowly turned to follow the curve as each cut is made, for if a series of cuts is made, turning the shears only after each cut, the line will be jagged and uneven.
When dealing with fairly heavy-gauge metal—20-gauge iron, for example—it is often found better to grip one handle of the shears in the vice. By this means greater pressure can be applied to the other handle, whilst it is easier to guide the sheet with the left hand. This method must not be abused, however, or else there will be a danger of bending or breaking the tool.
A good pair of shears requires very little attention beyond occasional oiling of the rivet and, still less rarely, tightening of the rivet. If the cutting edges become blunt or snipped it is necessary to sharpen them, either by grinding the edge or by rubbing it down with a coarse oilstone slip. In case any such attention is required, it is well to remember that the angle of the edge should be approximately 85 degrees.
If it is made too sharp there will be greater likelihood of its being snipped, whilst if the angle is too blunt the shears will not cut as easily. If any sharpening is required, take care that metal is removed from the actual cutting edge only; the shearing faces should be left perfectly fiat. To ensure this they should be rubbed down with an oilstone or oilstone slip after sharpening, holding this flat against the side of the blades.
Do you have used machinery for sale?
Over 8,000 sellers have listed their surplus equipment with us since 2006.
Selling with Kitmondo is free, efficient and fast.
Start selling now